 Bouwverslag van mijn RC IOM zeilboot "KOTA 3"
Engelstalige verhandeling over het zelf maken van de tuigage voor een RC zeilboot
Rig building
Courtesy of Andreas Schiebel (GER 202)
Translated from the German language with the generous help of Bill Young, USA
Rig Building Tips:
IOM class rules don’t allow rotating masts and the masts mostly used are without an internal track. The best mast is 12mm or ½” aluminum tube available at
local hardware and metal stores. If you want to invest more you can order from RC yachting accessory dealers as well and save maybe 50g with the rig.

Exact mast length is not fixed by the rules; however, the luff length is fixed. The lower end of the mast is fitted to its mast box depending on the boat. The gooseneck which connects the main boom to the mast is installed above and as close to the deck as possible. Luff length is measured from there. The top end of the mast is not fixed; however, we want to save weight on top so we don’t want the mast to extend too far. This upward extension depends on your method of tensioning the luff; you’ll need more extension if you tension the luff from above.

The mast crane shown here is built from a 4mm brass tube fitted to the mast top using a piece of hardwood with a hole drilled. The mast top also has a 2mm brass tube inserted into the hardwood to accommodate a rotating main sail mount.

Shrouds are made from nylon coated stainless steel braid available from the local fishing supply store. You
should get the appropriate tubes or sleeves that you squeeze down to secure the stainless steel braid.
Shown below are several versions of turnbuckles that vary in price and weight.


The shrouds are fixed at the height of the jib stay. There are two different solutions: First, a commercial fitting riveted to the mast which looks good but cannot be changed after installation. Second, use homemade steel wire hooks inserted in holes you drill into the mast. Corrections are as easy as additional holes drilled into the mast.

The jib halyard and forestay are fitted to the jib stay with a common hook. Bowsies are used for adjustments. The forestay need not be made of stainless steel; but, it is stronger. The distance from the head of the main sail to the jib stay is defined by the IOM class rules. The jib’s tack is knotted just below the forestay to the jib boom.

I use 3mm OD thin walled aluminum tube for the spreaders. A steel rod that fits the ID of the spreader tube is
inserted through a hole in the mast and the aluminum spreaders are glued on. To keep the shrouds on the spreaders, I fun them through eye bolts that fit the aluminum tube.
You could also run the shrouds through a piece of steel wire bent like a hairpin or a splint which is inserted onto the ends of the spreader tubes.
The Gooseneck


The gooseneck can be bought as a ready to use fitting; however, you can build one yourself using brass tubes and other parts available in most hardware stores.
If you do not have a lathe and the ability to solder aluminum, the best DIY solution is to use brass tubes of different diameters from the hardware store and ball bearings from the local model shop. A 6mm ID brass tube is the outer shell and holds the ball bearings, a 5mm tube that fits into the outer tube acts as spacer and sleeve for a 3mm brass rod. You will also need another tube whose ID just slips over your mast for a snug fit. This latter part is mast link.

Now I assemble the ball bearings and the spacer on the brass rod. After assembly, the subassembly is fixated with a drop of solder (or possibly a spot of metal epoxy but be careful with this not
to glue the brass rod into a fixed position).
Next, flatten one end of the brass rod from two sides with a file. When done drill a small hole through the flattened area as shown in the picture. Now, you bend the rod to 90o as shown in the
picture below.

Now solder the two tubes (mast link and ball bearing support) exactly parallel to each other; then insert the subassembly with the ball bearings into the bearing support tube. Close both ends of
the tube with 2mm long cuts from the 5mm brass tube and solder in place.
Use 8mm OD aluminum tube or anything similar for the booms. Find an aluminum rod whose OD fits the ID of the aluminum boom tube. Using a hack saw, cut a slot and make a snug fit with the
flattened end of brass rod. Next drill a small hole through the aluminum rod so that you can insert a steel pin through this hole and the one you drilled in the brass rod of the gooseneck. The
goal is for the boom to have freedom of movement up and down when attached to the gooseneck. Now glue the aluminum rod into the boom tube.
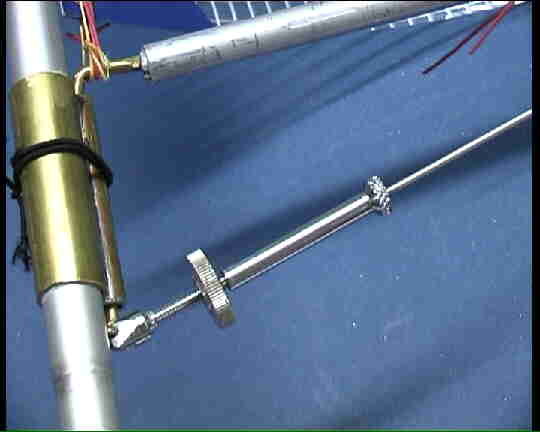
A boom vang controls the up/down movement of the boom. Use a 3mm ball link secured with a self locking nut and attach it to the bottom of the gooseneck.

The IOM class rules require a boom vang which holds to pull and yields to pressure so such a linkage must be built.
Take a length of 2mm ID brass tube and tap an M3 thread through it. Next, cut two short pieces of 2mm OD brass tube. Take one of the 2mm OD brass tubes and insert a length of piano wire into it
and solder the two together. Slide the other 2mm OD tube over the piano wire and solder this tube into one end of the 2mm ID tube. Ensure that the rod can move freely inside the tube. Take a
length of M3 threaded rod and screw an M3 nut onto it. Then screw one end into the ball link on the gooseneck; and screw the other end into threaded 2mm ID tube. The gooseneck is now complete and
can be attached to the mast with a small tapping screw. When you have done this bend and cut the piano wire at the length that fits to the holes in your boom. The assembly should now look like
the one on the right.
The wire of the vang is simply hooked onto the main boom. Rig BuildingTo guide the mainsheet, you clip triangular eyelets to the boom (see photo). These eyelets need to be large enough for the
hook to attach the main sheet can pass through it.

The eye is exactly over the sheet post for the main sheet mounted with two holes in the boom. The main sheet is attached to the boom with a hook (see photo).

The main sheet is attached to the boom with a hook (see photo). To secure the hook in the boom slide an o-ring or rubber band over the hook.

Assorted DIY eyes, clews and hooks.


The clews are spring steel hooks bent from 1mm piano wire over a 6mm rod.
Two turns are enough. (See photo.)


To attach the forestay take little snaps from the fishing shop and thread them through a small hole at the end of the boom.
Balancing weights can be used on the jib boom to help jib sensitivity in light winds.
A balancing weight can be made by bonding small lead weights (10g to 30g) to a thin brass tube. It is mounted to the front end of the jib boom with two o-rings and adjusted to balance the jib
while tilting the boat sideways.
The jib boom – deck join can be done in different ways.
 Attach three eyelets to the deck and select those based on the rig in use.
A small aluminum channel gives all trim option later.
A small hook connects to the fishing tackle swivel which, in turn, can be hooked to the jib boom using a triangular hook like on the main boom. Another option is to simply tie it to the boom.
Some sailors don’t even use the swivel but use a straight line instead.

A topping lift should also be used for a very controlled jib trim. The topping lift is hooked between the jib stay and the rear of the jib boom and is adjusted with a bowsie.
Unfortunately, the topping lift likes to get caught on the spreaders. To prevent this, a very thin Kevlar cord (tackle shops) can be used between the jib and the lift to keep the line from
getting entangled in the spreaders. See the photo below.


To have the main sheet just below the pivot point on the main boom, use a sheet post. The main sheet runs through a tip ring (tackle shop); the height of the traveler rod can be adjustable using a splint.

^ Twee racende IOM's

^ Wedstrijdboten hebben allemaal een registratie-nummer en je kunt zien uit welk land ze komen. Zo komen de twee bovenste boten uit Nederland, maar de boot hierboven uit de Verenigde Staten.

^ Boven in het grootzeil is de IOM herkenbaar aan het klasseteken.


^ Dit geeft je een idee over de proporties van een IOM

^ Totaalplaatje van een IOM. Goed te zien is hier de diep stekende kiel met daaronder de loden bulb.
Deze weegt hooguit 2½ kg.

^ De bulb is optimaal gestroomlijnd om zo weinig mogelijk weerstand in het water te hebben. Doordat de kielvin zo diep steekt met daaronder deze loden bulb als contragewicht, is de boot in staat om harde wind te weerstaan, zonder dat hij kapseist.
Hoewel hij bij krachtige wind wel eens 'op één oor' kan gaan liggen, richt hij zichzelf altijd weer op. Het is namelijk zo dat, wanneer de winddruk hoog wordt en de boot platter gaat liggen, de wind daardoor weer meer over het zeil heen blaast, richting top. Daardoor vermindert de druk op de zeilen weer en zo krijg je een zeker evenwicht tussen winddruk en helling van de boot. Valt de wind op een gegeven moment weg, dan zorgt dit contragewicht er voor, dat hij zich vanzelf weer opricht.
Interesse?


^ Dit zijn natuurlijk profes-sioneel gebouwde boten. Die zien er zéér gelikt uit, geheel in kunststof (ABS).
Dit Skandinavisch ontwerp, de Azetone Mk II, is in Nederland gebouwd in licentie.
Prijs met één stel zeilen:
€ 2075,00.


De NED 141

^ De NED 141 in volle aktie tijdens het ronden van een boei. Het kan er fel aan toe gaan in een wedstrijd! Filmpje!


^ De SmartWinch 280D.
Een hele mooie (en dure!) zeilwinch van RMG. Links zit de dubbele trommel, waar de schoten op- en afdraaien om de zeilen in te halen of te vieren. Rechtsonder zit de electromotor en dat rode ding daarboven is een potmeter, die het aantal omwentelingen regelt van de trommel.

^ Hierboven een voorbeeld van een negatieve spiegel.

